The surface texture of a plastic part influences much more than how it looks and feels.
Surfaces can affect mechanical performance, chemical interactions, electrical resistance or conductivity, friction, corrosion resistance, and many other factors. How are these textures created, and why is this important for your project development goals?

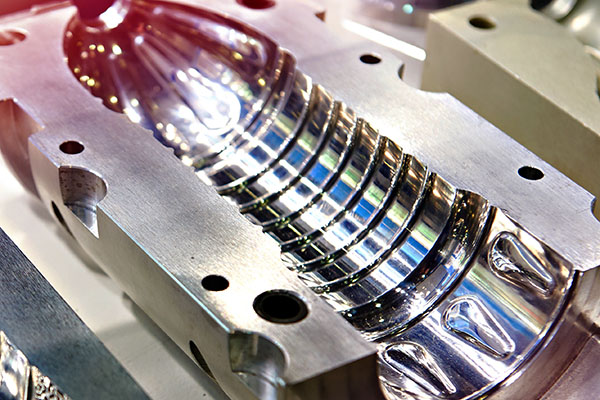
Surface textures are imparted to the piece by the plastic injection mold tools that are used to form them. We will look at how these textures are applied to mold tools, and how this affects your product development timeline, production efficiency, and cost.
Understanding surface roughness classifications
Before we can discuss the specific mold textures, we need to first understand how to describe and classify surface finishes generally. And one of the most common ways to do that is by using the standard terminology created by the Plastic Industry Association. This organization used to be called the Society of the Plastics Industry, or SPI. Their surface roughness categories became so ubiquitous that they’re still commonly referred to as SPI gauges.

What are the injection molding surface finish categories?
In the PIA classification system of surface finishes for mold tools, there are four major grades: A, B, C, and D. Group A finishes are made with diamond buffing, B with grit sandpaper, C with grit sanding stones, and D with pressure blasting using glass beads or aluminum oxide grains.
How do different surface finishes on mold tools affect product cost?
The higher you go in the classification system of surface finishes for mold tools, the more time and effort it takes to produce the finish. In fact, each step of refinement requires completing the step preceding it. There are no shortcuts here so the production costs are additive.
Let’s see how each finish is done.
Listen to Star Rapid CEO’s explanation of surface treatments for production tooling in this Serious Engineering video.
Finishes created by polishing
Category A is made with diamond buffing and is considered to be the highest standard grade, what people consider to be the shiniest or glossy.
Part of this is due to the fine grain of the diamond buffing paste, but also some is due to the way it’s applied. An “A” surface on the mold tool makes a very glossy finished part, and they’re also used for optically clear plastic.
A rotary tool is used to polish the surface in a random, non-linear pattern. This tends to scatter or reflect light without indicating a clear texture. There’s no “direction” to the waviness of the surface, so it looks the same no matter the viewing angle or the angle of light.
In the A category there are three levels, each representing a different degree of refinement. And, for each level, PIA gives a standard Ra value as a reference.
For example, A-3 corresponds to Ra 2~3. Surface flatness is a subject unto itself, but this essentially means it’s very flat.
Finishes made with sandpaper
Now compare this to Category B, made with sandpaper.
This kind of surface finish is applied in a back and forth motion, so it leaves behind characteristic linear scratches producing a very obvious pattern. For this reason, it’s possible to have an SPI surface finish for B-1 which also measures the flatness of Ra 2~3, equal to an A3 finish.
But this finish doesn’t look the same as A3, nor would the plastic part be made from such a tool. Clearly, surface flatness is only one aspect of overall surface texture.
A B-grade surface finish is considered semi-gloss. It’s fine enough to hide mold defects and tooling and machining marks while being less expensive to produce than A-Grade. These finishes are applied with sanding grit ranging from 600 grit for B-1, 400 for B-2, and 320 grit for B-3.
Finishes made with the grit stone
The C-Grade finishes are made with grit sanding stones.
As with B-grade finishes the grits of the stones also range from 600 to 320, though they leave behind a surface that is rougher and less flat because the stones are more aggressive in their cutting action. Such a process is used to quickly erase tooling and mold marks and will leave behind a matte surface finish on plastic parts.
Finishes are made by blasting
Rougher finishes are made by abrasive blasting with sand or glass beads.
These correspond to PIA class D. Because of the random nature of the spraying, the resulting surface finish is uniform and non-directional. This classification is used to produce dull or flat finishes on plastic parts.

Finishes made with the chemical engraving
Surface textures can be applied to mold tools using special photoetching techniques. MoldTech is an example of a well-known specialist for this type of texturing service.
It involves using masks to create a pattern on the tool wall, exposing some areas while protecting others. Then, a chemical is applied that reacts with the exposed metal, selectively etching it away in a controlled fashion to produce a myriad of patterned effects.
These patterns are made to reproduce not only abstract geometrical designs but also to simulate the look of natural stone, leather, or wood grain. It should be noted that whenever a highly figured surface is made in a mold tool, it usually requires an increase in the tool wall’s draft angle.
That’s because heavy textures create more grip or friction that must be counteracted with more drafts to allow for part release.
Surface treatments for production tooling
In addition to using mechanical abrasion or polishing to prepare a mold surface, there are also several types of surface coatings that can be applied to the tool. These treatments impart a subtle texture to the tool walls, while also changing the tool’s mechanical and chemical properties in important ways. To understand why this is important, let’s look briefly at the science of tribology.

What is Tribology?
Tribology is the study of friction and the interaction of surfaces in relative motion.
Tribology research is used to discover new and better ways for surfaces to interact without being destroyed in the process. But there is no one solution that is best for everyone. It all depends on your particular application.
Many people don’t realize that mold tools are subject to enormous friction, as the hot resin is very quickly injected under great pressure. Understanding and controlling the potential damage created by this friction is one of the tooling engineer’s biggest challenges.
The amount of wear a mold experience depends on many factors including the base metal, production volume, cooling circuits, resin type, design complexity, surface texture, and many more.
Because there are so many variables there are different treatment solutions to help withstand heat, increase hardness, resist corrosion, and lower friction for better part release.
Here is a closer look at the top three general types of production tools.
1. Plating
One of the earliest forms of mold treatment is chrome plating. This increases tool hardness to resist abrasion when using glass-filled resins. Chrome helps to prevent rust but it’s not resistant to chemical outgassing when using corrosive resins like PVC.
Also, chrome plating requires the use of a separate anode. The anode adds expense to the build and, because of its size and shape, it can’t reach deep cavities or thin features in a mold.
Electroless nickel plating doesn’t need an anode so it can be used to coat all features inside the mold uniformly. It helps the mold resist the chemical attack but it’s not as good at handling abrasive fibers.
Nickel-Boron Nitride, another common plating, also improves abrasion and corrosion resistance without adversely affecting heat transfer properties. But its main advantage is that it greatly reduces friction for moveable sliders, cores, and other high-wear areas in the tool.
All plated surfaces tend to have a gloss or semi-gloss finish, equal to Class A or B.
2. Physical vapor deposition
PVD uses a source such as ceramic or metal which is then struck with a high-energy ion beam to cause it to sputter into a plasma. This plasma bonds to the tool wall in very thin layers with great adhesive strength.
How thin are these layers? Some are nanometers or less than one micron, so not enough to affect the final part dimensions in most cases.
One of the most common applications is Titanium Nitride (TiN). It’s exceptionally durable and increases hardness greatly while offering better corrosion resistance than chrome. It can withstand the chemical attack of PVC resins while enhancing lubricity. One potential drawback is that it’s applied at temperatures of 800°C, so this might affect the tool’s heat treatment. Another limitation is that this is a line-of-sight application so it can’t be applied to hidden areas.
Because PVD coatings are so thin, they can adhere to very fine scratches on the tool surface, meaning they can be applied even to fairly rough Class C or Class D finishes.
3. Chemical vapor deposition
Unlike PVD, chemical vapor deposition uses a chemical reaction to produce a gaseous thin film.
CVD coatings are thicker than PVD and are applied at even higher temperatures. The advantage is that diamond coatings can be applied, offering the highest possible wear resistance and increased tool hardness for an extremely long tool life. CVD coatings also don’t need to be applied in line-of-sight, so the whole tool can be treated.
One drawback to CVD is that because of the high application temperatures, mold tools must be heat treated a second time after coating.
How to express the shine of your plastic injection molded part with gloss
As we have seen, surface finishes can look different even if the Ra values are similar.
To further specify the look you want on your injection molded parts, you should know about gloss. Gloss is defined as the reflectance of a surface compared to a polished black glass standard.
We use a simple measuring device called a gloss meter. It bounces light off the surface of a sample, at different angles depending on the Ra value being tested. The measurement values are called gloss units or GU. The black glass standard is rated as 100, so measured gloss units from a target part are compared to this reading.
From these gloss readings, it’s then possible to describe a surface as high-gloss, semi-gloss, matte, or flat. Taken together with a PIA mold surface number, this is the information that we need to texture your mold tools so you get the finished injection molded parts that you want.
For more information about production tooling, subscribe to our newsletter to receive industry-related information about product development, manufacturing, and more.
If you liked reading this article, we recommend the following content:
Tagged:

