The Cause And Avoidance Of Sink Marks On Plastic Injection Molded Parts
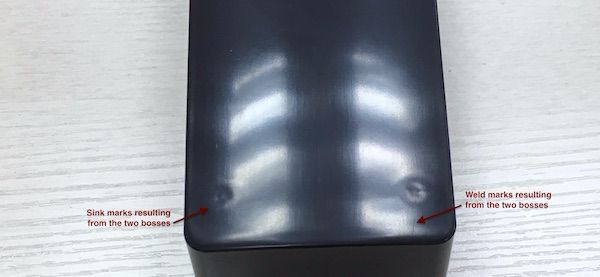
Sink Marks
Shrink marks are a common occurrence on plastic injection molded parts. We’d like to help product developers to mitigate the effects of sink marks by using design best practices. Although they may be unavoidable in some cases, we think we can offer useful suggestions based on our expertise in mold manufacturing.
What causes them? Sink marks happen when areas of hot liquid resin cool and shrink at different rates. If your product design has significantly more mass in one area than another, it will shrink more as it contacts the tool wall. Here is some useful information to guide your design decisions.
Packing Pressure
One way to help fill the mold completely before the gate freezes is to increase the packing pressure. Be aware that only increasing the pressure by itself can introduce other problems. That’s why we recommend a balanced approach by following these guidelines:
Balance the packing pressure by lowering the injection speed. We do this in order to avoid creating molded-in stress. Keep in mind that this approach can slow down the cycle time, which is not a big deal for small production runs.
Alter the coolant temperature in the mold. This has the affect of moving the sink mark from one place to another.
Move the location of the gate. By using this method we can help you to ensure that the sink mark only appears on a non-cosmetic area of the part. Moving the gate might require compromises in other areas of the design.
Use a blowing agent. A small amount, no more than 0.5%, increases the internal pressure of the material which helps it to pack out more completely.

Ribs And Bosses
The areas of a part design that are close to ribs and bosses are the most common places where sink marks occur. Bosses are important features, of course, because they’re used as support structures for inserts or self-tapping screws that hold assemblies together. Use these design tips to help optimize your use of bosses.
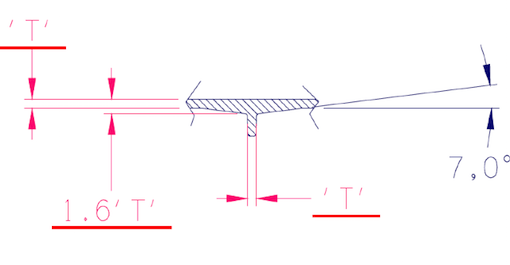
Balancing Rib and Wall Thickness
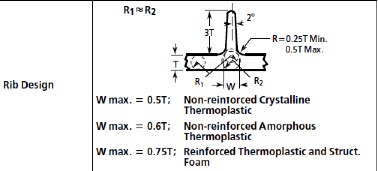
Liquid resin follows the path of least resistance, filling thicker wall sections first. When the resistance in “T” becomes too much, it then fills the thinner rib sections. This means that the wall sections will cool faster when they contact the tool wall, causing a sink mark to form. Designers should therefore limit the differential between the wall thickness and the thickness of the rib at its base. Also, do not make a rib height greater than 3x of the wall thickness.
The Seven Degree Rule
It’s a good idea to use a gradual 7° slope at the base of any rib that you use in your design. This has the advantage of avoiding surface blemishes while helping the mold to pack more uniformly. Remember that the gate should be close enough to the base to pack easily.


Design of Bosses
A boss is a reinforced post that will hold a threaded insert or a self-tapping screw. Since a boss represents additional mass, sink marks can potentially be caused if the boss is not designed correctly. Here are the most important points to consider to achieve the best results:
Make the wall thickness of the boss equal to the inner diameter of the hole whenever possible.
- For stronger bosses, make the maximum outer wall thickness no more than 2.5x of the inner diameter.
- Use a gradual 7 degree radius at the base of the boss. Please note that in order to fill this area completely, the boss needs to be as close to the gate as possible.
- Do not put the boss immediately against an outer wall section, which will create too much mass. Instead, attach the boss to the wall by using a rib, or core out the wall section immediately adjacent to the boss.
A Design Feature to Avoid
Sometimes product designers will attempt to make the base area around a boss thinner to counteract its mass, and it’s true that this can help to prevent a sink mark.
But this type of design introduces other problems, which is why we recommend against it. For one thing, the base will be weak and it can lead to part failure. And a thin section interrupts the resin flow during injection which causes stress marks. That’s why we advise our partners to stick with the design suggestions outlined above.

The above considerations demonstrate how important it is to carefully design mold tools and part geometries to accommodate the facts of thermal stresses within plastic injected parts. Our engineers perform a design for manufacturing review on all plastic injection molding projects to ensure that the risk of sink marks are eliminated. If you’d like to discuss your next project with one of our experts, send us your CAD file for a free quote and design review.

